通过流水线构建多架构镜像
在 Jenkins 中,采用 Podman 来代替 Docker 作为构建镜像的工具,主要是因为 Podman 不需要挂载 docker.sock, 同时 Podman 支持 rootless 模式,可以在不需要 root 权限的情况下使用,安全性更高。
在 Jenkinsfile 中,可以直接使用 Docker 命令或者 Podman 命令,大部分情况下是相同的。 目前已经使用 Podman 代替了 Docker(alias docker=podman),执行 Docker 命令时,实际上是调用 Podman 来执行的。
构建镜像的前提
与 Docker 类似,Docker 支持多平台构建的前提是需要宿主机支持多平台构建,利用 QEMU 来模拟其他平台的环境。在构建多架构镜像之前,需要进行一下两项配置:
配置 binfmt_misc 模块
配置 binfmt_misc 模块(必须),binfmt_misc是Linux内核的一个模块,可以在内核中注册一个二进制格式,使得内核能够识别并执行这种格式的二进制文件。
因为binfmt_misc模块权限较高,需要 root 权限 才能操作,所以需要 手动在所有运行 Agent 的宿主机上 执行以下操作:
find /proc/sys/fs/binfmt_misc -type f -name 'qemu-*' -exec sh -c 'echo -1 > {}'
wget -O qemu-binfmt-conf.sh https://raw.githubusercontent.com/qemu/qemu/master/scripts/qemu-binfmt-conf.sh && chmod +x qemu-binfmt-conf.sh && ./qemu-binfmt-conf.sh --qemu-suffix "-static" --qemu-path "/usr/bin"
安装 QEMU 的二进制文件
目前工作台内置的基础镜像(base、go、nodejs、python、maven)中已经包含了 QEMU 的二进制文件,不需要单独操作。
如果您的 Agent 镜像不是上述的基础镜像,您可以通过以下两种方式添加qemu的二进制文件:
-
在 Dockerfile 中添加 QEMU 的安装命令
-
在您的 Agent 镜像中通过如下脚本直接添加 QEMU 的二进制文件
关于 QEMU 和 binfmt_misc 的更多信息,请参考:
构建多平台镜像
Podman 兼容 Dockerfile 的语法,但是实际上并不支持 Dockerfile 中的 --platform 参数(即不支持交叉编译),
采用的依旧是 QEMU 模拟其他平台的环境(仿真),因此构建速度也会比 Docker 慢。
Podman 不支持直接通过 --platform 一次性打出多个平台的镜像,需要打出多个平台的镜像后使用 Podman 的 manifest 命令进行合并,
不过支持在 build 命令中添加 manifest 参数便捷地添加镜像到 manifest 中。
以构建 Dao-2048 镜像为例,Dockerfile 如下:
FROM nginx # 如果需要构建多平台镜像,需要保证基础镜像支持多平台
COPY . /usr/share/nginx/html
EXPOSE 80
CMD sed -i "s/ContainerID: /ContainerID: "$(hostname)"/g" /usr/share/nginx/html/index.html && nginx -g "daemon off;"
在构建镜像时指定 manifest 参数
依次运行以下命令:
target=release.daocloud.io/demo/dao-2048:v1  # (1)!
platform=linux/amd64,linux/arm64 # (2)!
docker build -f Dockerfile --platform=$platform  --manifest release.daocloud.io/demo/dao-2048:v1 . # (3)!
docker login xxx # (4)!
docker manifest push --all $target # (5)!
- 最终镜像的名称
- 需要构建的平台
- 构建多架构镜像
- 登录镜像仓库
- 推送
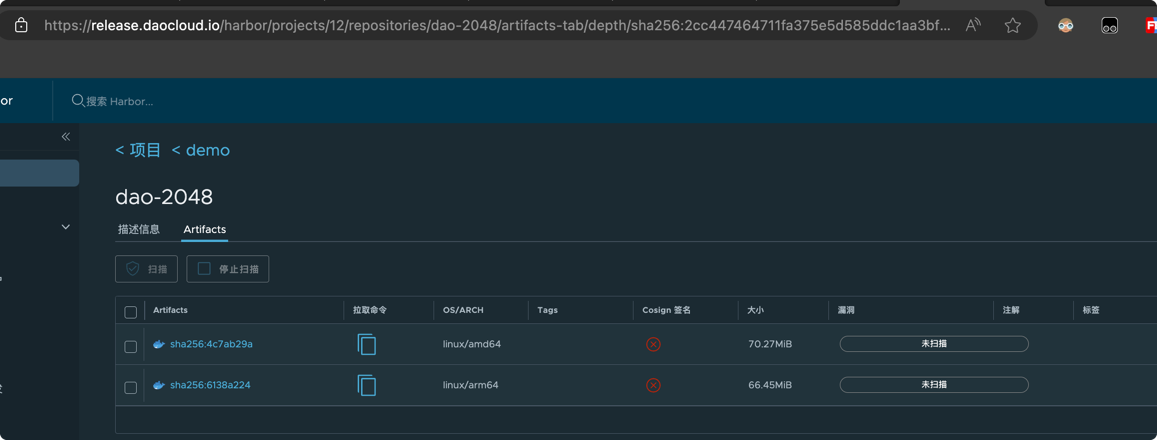
最终构建出的镜像如下,包含了 amd64 和 arm64 两个平台的镜像:
当然,如果直接在 Jenkinsfile 中使用 Docker 命令,不支持 manifest 参数,可以通过单独构建镜像的方式来实现,最终效果也是相同的,步骤如下:
-
打出不同平台的镜像
-
使用 podman manifest create 创建 manifest 镜像
-
使用 podman manifest add 将不同平台的镜像添加到 manifest 镜像中
-
使用 podman manifest push 将 manifest 镜像推送到镜像仓库
Jenkinsfile 示例
pipeline {
  agent {
    node {
      label 'base'
    }

  }
  stages {
    stage('clone') {
      agent none
      steps {
        container('base') {
          git(branch: 'master', credentialsId: 'zxw-gitlab', url: 'https://gitlab.daocloud.cn/ndx/dao-2048.git')
        }

      }
    }

    stage('build & push') {
      agent none
      steps {
        container('base') {
          sh '''pwd
ls -a

target=release.daocloud.io/demo/dao-2048:v1
platform=linux/amd64,linux/arm64
docker build -f Dockerfile --platform=$platform  --manifest release.daocloud.io/demo/dao-2048:v1 .
docker manifest push --all $target'''
        }

      }
    }

  }
}